WLED Updating screen from Home Assistant
- Install WLED to an (e.g.) ESP32 and connect a Matrix display, set the display to typically 32×8 pixels.
- Set the WLED Wi-Fi node name to ‘wled’ for convenience of finding the device on your network.
- mDNS address (leave empty for no mDNS): set to wled
- The your wled display will be located at http://wled.local/ on your local network.
- Set the LED Configuration display option to the following:
- Length: 256 (as there are 256 led’s)
- Set the 2D Configuration to:
- 2D Matrix
- Orientation: Vertical
- Serpentine: enabled
- Dimension: 32 Wide by 8 High
- In Home Assistant (HA):
- Go to File Editor
- Edit the file ‘configuration.yaml’
- enter the following:
- rest_command:
- wled_text:
- url: http://wled.local/json/state
- method: POST
- payload: ‘{ “bri”: {{brightness}},”seg”:[{“col”:{{color}}, “n”:”{{text}}”}]}’
- See Image-1 below
- wled_text:
- rest_command:
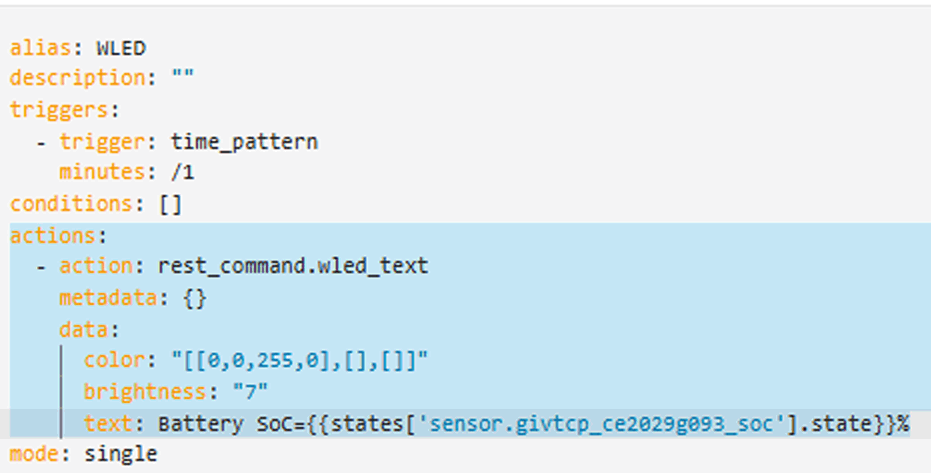
- Go to HA Settings, Automations, create a new Automation:
- Call it WLED
- For the Trigger enter Timer, then for minutes enter /1 that means every minute call the automation
- For the Action enter Yaml editor mode at top right, enter the following:
- actions:
- action: rest_command.wled_text
metadata: {}
data:
color: “[[0,0,255,0],[],[]]”
brightness: “7”
text: Battery SoC= {{states[‘sensor.givtcp_ce2029g093_soc’].state}}% - See Image-2 below
- action: rest_command.wled_text
- actions:
- Finished
Image-1 Restful setup

Image-2 Automation Setup