The Complete Hardware Guide
Benchmark
sudo curl https://raw.githubusercontent.com/TheRemote/PiBenchmarks/master/Storage.sh |sudo bash
SSD Health Check
sudo smartctl /dev/nvme0n1p2 –health –all
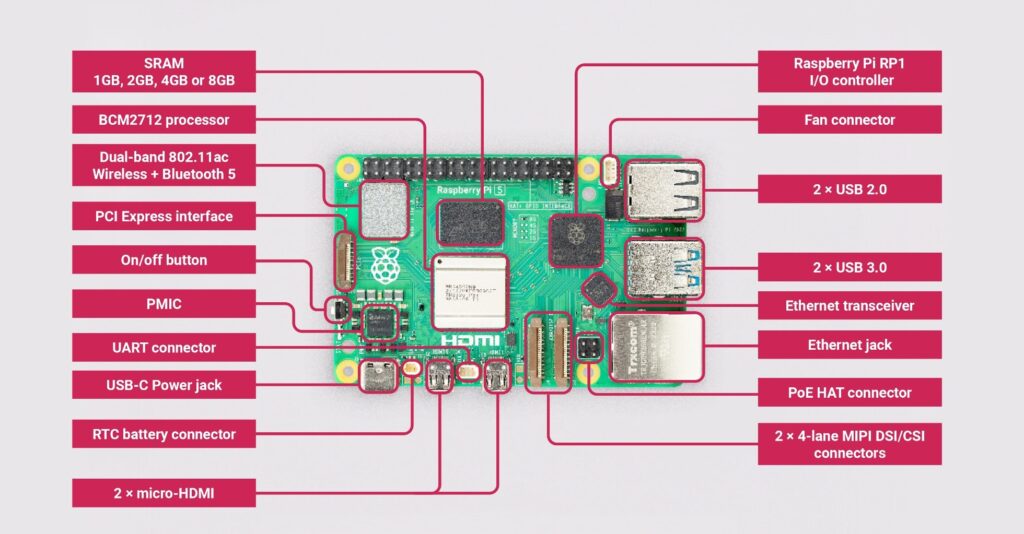
Hardware Layout
RPi-5 Layout

After installation of the RTC Battery, display battery status with:
cat /sys/devices/platform/soc/soc:rpi_rtc/rtc/rtc0/charging_voltage
cat /sys/devices/platform/soc/soc:rpi_rtc/rtc/rtc0/charging_voltage_max
cat /sys/devices/platform/soc/soc:rpi_rtc/rtc/rtc0/charging_voltage_min
Check Operation of the RTC:
Setting-up a USB Speaker
Install a sound driver, in this example Pulseaudio:
sudo apt-get install pulseaudio
Check the driver is installed:
cat /proc/asound/modules
0 snd_usb_audio
1 vc4
2 vc4
Test the sound:
speaker-test -c2 -twav -l9 -D plughw:0,0
Set the sound level to maximum:
sudo amixer sset PCM 100% -M
timedatectl

               Local time: Mon 2024-01-08 15:59:38 GMT
           Universal time: Mon 2024-01-08 15:59:38 UTC
                 RTC time: Mon 2024-01-08 15:59:38
                Time zone: Europe/London (GMT, +0000)
System clock synchronized: yes
              NTP service: active
          RTC in local TZ: no
Setting-up a USB Speaker
- Install a sound driver, in this example Pulseaudio:
- sudo apt-get install pulseaudio
- Check the driver is installed:
- cat /proc/asound/modules
0 snd_usb_audio
1 vc4
2 vc4
- cat /proc/asound/modules
- Test the sound:
- speaker-test -c2 -twav -l9 -D plughw:0,0
- Set the sound level to maximumsudo curl https://raw.githubusercontent.com/TheRemote/PiBenchmarks/master/Storage.sh |sudo bash
- sudo amixer sset PCM 100% -M
NVME Speed check
sudo hdparm -t –direct /dev/nvme0n1
Simple Benchmark:
sudo curl https://raw.githubusercontent.com/TheRemote/PiBenchmarks/master/Storage.sh |sudo bash
Changing RPi5 Fan Temperatures
The documentation for available adjustments to config.txt are iat:
/boot/firmware/overlays/README
You should not make any changes to the README file – it is placed there as documentation to explain how to make the changes needed in config.txt for temperature thresholds.
fan_temp0               Temperature threshold (in millicelcius) for 1st cooling level (default 50000). Pi5 only.

fan_temp0_hyst          Temperature hysteresis (in millicelcius) for 1st cooling level (default 5000). Pi5 only.

fan_temp0_speed         Fan PWM setting for 1st cooling level (0-255, default 75). Pi5 only.

fan_temp1               Temperature threshold (in millicelcius) for 2nd cooling level (default 60000). Pi5 only.

fan_temp1_hyst          Temperature hysteresis (in millicelcius) for 2nd cooling level (default 5000). Pi5 only.

fan_temp1_speed         Fan PWM setting for 2nd cooling level (0-255, default 125). Pi5 only.

fan_temp2               Temperature threshold (in millicelcius) for 3rd cooling level (default 67500). Pi5 only.

fan_temp2_hyst          Temperature hysteresis (in millicelcius) for 3rd cooling level (default 5000). Pi5 only.

fan_temp2_speed         Fan PWM setting for 3rd cooling level (0-255, default 175). Pi5 only.

fan_temp3               Temperature threshold (in millicelcius) for 4th cooling level (default 75000). Pi5 only.

fan_temp3_hyst          Temperature hysteresis (in millicelcius) for 4th cooling level (default 5000). Pi5 only.

fan_temp3_speed         Fan PWM setting for 4th cooling level (0-255, default 250). Pi5 only.
You should not attempt to make these changes to the .dtb file. The .dtb files are all “compiled”, and not meant to be edited manually.
Instead, you should make your changes in the config.txt file located in /boot/firmware/config.txt (last I checked this is where it was found).
It’s a bit strange I suppose, but the documentation for available adjustments to config.txt are in this location on your RPi: /boot/firmware/overlays/README. You should not make any changes to the README file – it is placed there only for documentation explaining how to make the changes needed in config.txt
Here are the parameters relevant to the changes you want to make for your RPi 5 fan (taken from the README file):
And so we see from reviewing the information above that the default is set up to increase the fan speed as the temperature increases:
fan_temp0 Temperature threshold (in millicelcius) for 1st cooling level (default 50000). Pi5 only.
fan_temp0_hyst Temperature hysteresis (in millicelcius) for 1st cooling level (default 5000). Pi5 only.
fan_temp0_speed Fan PWM setting for 1st cooling level (0-255, default 75). Pi5 only.
fan_temp1 Temperature threshold (in millicelcius) for 2nd cooling level (default 60000). Pi5 only.
fan_temp1_hyst Temperature hysteresis (in millicelcius) for 2nd cooling level (default 5000). Pi5 only.
fan_temp1_speed Fan PWM setting for 2nd cooling level (0-255, default 125). Pi5 only.
fan_temp2 Temperature threshold (in millicelcius) for 3rd cooling level (default 67500). Pi5 only.
fan_temp2_hyst Temperature hysteresis (in millicelcius) for 3rd cooling level (default 5000). Pi5 only.
fan_temp2_speed Fan PWM setting for 3rd cooling level (0-255, default 175). Pi5 only.
fan_temp3 Temperature threshold (in millicelcius) for 4th cooling level (default 75000). Pi5 only.
fan_temp3_hyst Temperature hysteresis (in millicelcius) for 4th cooling level (default 5000). Pi5 only.
fan_temp3_speed Fan PWM setting for 4th cooling level (0-255, default 250). Pi5 only.at 50 degC (fan_temp0), the fan comes on at a speed of 75 (fan_temp0_speed), and will remain on until the temperature reaches the hysteresis point of 45 degC (45 = fan_temp0 – fan_temp1_hyst), at which point it will turn off.
at 60 degC (fan_temp1), the fan comes on at a speed of 125 (fan_temp1_speed), and will remain on until the temperature reaches the hysteresis point of 55 degC (55 = fan_temp1 – fan_temp1_hyst), at which point it will reduce to fan_temp0_speed.
etc for fan_temps 2 and 3.
The designers have implemented a detailed algorithm for fan cooling. For the change that you want to make, it is suggested to begin by adding the following lines to your config.txt file using the nano editor (or whatever editor you’re comfortable with). In other words:
sudo nano /boot/firmware/config.txt
Once the file is open, add these lines:
dtparam=fan_temp0=40000
dtparam=fan_temp0_hyst=10000
dtparam=fan_temp0_speed=125
This will start the fan at a speed of 125 when the temp reaches 40 degC, and turn it off when the temp reaches 30 degC. Be aware this example temperature is quite low, and the fan may run continuously.